โดยทั่วไปในการพัฒนา Software มักจะต้องมีการส่งข้อมูลไปมาระหว่าง Application/Server/Device และมักมีการ serialization ข้อมูลเพื่อส่งไปยังอีกจุดเป็นเรื่องปกติ โดยวิธีการ serialization data structure ที่หลายคนนึกถึงก็มักจะเป็น JSON หรือ XML เป็นต้น แต่ในวันนี้เราจะมาแนะนำเครื่องมือในการ serialization ข้อมูลที่น่าสนใจอีกตัวนั่นก็คือเครื่องมือที่ชื่อว่า Protobuf นั่นเอง

Protobuf คืออะไร
Protobuf หรือชื่อเต็มคือ Protocol buffer โดยแรกเริ่มเป็นเครื่องมือสำหรับ serialization ข้อมูลที่พัฒนาขึ้นมาโดย Google เพื่อใช้งานเป็นการภายในแทนการใช้ XML ที่มีขนาดใหญ่ในการส่งข้อมูล แต่ภายหลังก็ได้มีเปิด source code ออกสู่สาธารณะ
โดย Protobuf มีจุดเด่นคือ
- ข้อมูลมีขนาดเล็กเนื่องจากเลือกที่จะ serialization ข้อมูลออกมาในรูปแบบ binary ไม่เหมือนกับ JSON หรือ XML ที่เก็บข้อมูลในรูปแบบ string ที่ใช้พื้นที่เยอะกว่า
- ทำการ serialization/deserialization ข้อมูลได้เร็ว เนื่องจากในการใช้งาน Protobbuf จะต้องมีการประกาศโครงสร้างของข้อมูลไว้ล่วงหน้า ทำให้สามารถแปลงข้อมูลได้เร็ว
- ข้อมูลที่ได้จากการ serialization โดย protobuf นั้น ทั้ง forward-compatible และ backward-compatible หมายถึงแม้ว่าโครงสร้างข้อมูลจะมีการเพิ่มข้อมูลใหม่เข้ามา ข้อมูลนั้นยังสามารถ deserialization ได้ทั้งในโค้ดเก่าและโค้ดใหม่โดยที่ไม่เกิด error
- รองรับหลาย Programing language โดยภาษาที่ทาง Google รองรับอย่างเป็นทางการนั้นมี ภาษา C++, Java, Python, Objective-C, C#, Ruby, Go, PHP, Dart และ Javascript นอกจากนั้นยังมีภาษาอื่นๆที่ทางชุมชนนักพัฒนาเป็นผู้ดูแลอีกหลายภาษาเช่นกัน
ส่วนข้อเสียหลักๆของ Protobuf ก็คือ debug ตัวข้อมูลที่ serialization ออกมาค่อนข้างลำบาก เนื่องจากข้อมูลเป็น binary ไม่ใช่ string แบบ JSON หรือ XML ทำให้ไม่สามารถอ่านได้ทันที
Protocol buffers workflow
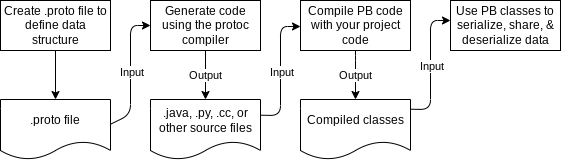
ในการใช้งาน protobuf จะมี 3 ขั้นตอนหลักๆคือ
1. สร้างไฟล์ .proto
ไฟล์ .proto เป็นไฟล์ที่ใช้เก็บโครงสร้างของ Protobuf message โดยประกาศ field ข้อมูลพร้อมทั้งประกาศชนิดข้อมูลของ field นั้นๆ ตัวอย่างเช่น
syntax = "proto3";

package Person;

message Person {
    string name = 1;
    int32 age = 2;
    string address = 3;
}
เป็นการประกาศ message type Person โดยมีข้อมูล 3 fields คือ
– name สำหรับเก็บชื่อ มีชนิดของข้อมูลเป็น string
– age สำหรับเก็บอายุ มีชนิดของข้อมูลเป็น int32
– address สำหรับเก็บข้อมูลที่อยู่ มีชนิดของข้อมูลเป็น string
2. Compile ไฟล์ .proto
ใช้ Protobuf compiler หรือ protoc ในการ compile ไฟล์ .proto ให้กลายเป็น source code ในภาษาที่เราต้องการนำไปใช้งาน โดยวิธีการติดตั้ง protoc สามารถดูได้จาก github ของ Protobuf เอง
ตัวอย่างเช่นต้องการ compile ไฟล์ .proto ที่สร้างไว้เพื่อไปใช้งานกับภาษา cpp สามารถทำได้โดยการเรียกใช้ protobuf compiler ด้วยคำสั่ง
protoc person.proto --cpp_out=. จากคำสั่งด้านบน แต่ละ arguments คือ
protoc: คำสั่งเรียกใช้งาน protobuf compiler
person.proto : path ที่เก็บไฟล์ .proto
–cpp_out=. : flag cpp_out ใช้สำหรับเลือกว่าจะ compile ออกมาเป็นภาษา c++ และ ระบุ path ที่จะเก็บไฟล์ที่ compile โดยหากต้องการเปลี่ยนภาษาที่จะใช้งานก็สามารถเปลี่ยน flag ให้ตรงตามภาษาที่ต้องการได้ เช่น หากต้องการ compile สำหรับใช้กับภาษา Java ก็เปลี่ยนเป็น –java_out หรือ ใช้กับภาษา python ก็เปลี่ยนเป็น flag –python_out เป็นต้น

ตัวอย่างไฟล์ header ที่ได้มาจากการ compile ไฟล์ person.proto สำหรับภาษา c++
แต่หากต้องการ compile ไฟล์ .proto เพื่อไปใช้งานกับภาษา python ไฟล์ที่ได้จากการ compile จะไม่ได้มีลักษณะเป็น python class ที่พร้อมใช้งานทันที ทำให้เวลานำไปพัฒนาใน IDE หรือ code editor ต่างๆ จะใช้งานฟีเจอร์ auto suggest หรือ auto complete ไม่ได้ เนื่องจาก IDE ไม่ทราบว่าโครงสร้างของ class เป็นอย่างไร
# -*- coding: utf-8 -*-
# Generated by the protocol buffer compiler.  DO NOT EDIT!
# source: person.proto
"""Generated protocol buffer code."""
from google.protobuf.internal import builder as _builder
from google.protobuf import descriptor as _descriptor
from google.protobuf import descriptor_pool as _descriptor_pool
from google.protobuf import symbol_database as _symbol_database
# @@protoc_insertion_point(imports)

_sym_db = _symbol_database.Default()


DESCRIPTOR = _descriptor_pool.Default().AddSerializedFile(b'\n\x0cperson.proto\"4\n\x06Person\x12\x0c\n\x04name\x18\x01 \x01(\t\x12\x0b\n\x03\x61ge\x18\x02 \x01(\x05\x12\x0f\n\x07\x61\x64\x64ress\x18\x03 \x01(\tb\x06proto3')
_builder.BuildMessageAndEnumDescriptors(DESCRIPTOR, globals())
_builder.BuildTopDescriptorsAndMessages(DESCRIPTOR, 'person_pb2', globals())
if _descriptor._USE_C_DESCRIPTORS == False:

     DESCRIPTOR._options = None
    _PERSON._serialized_start=16
    _PERSON._serialized_end=68
# @@protoc_insertion_point(module_scope)
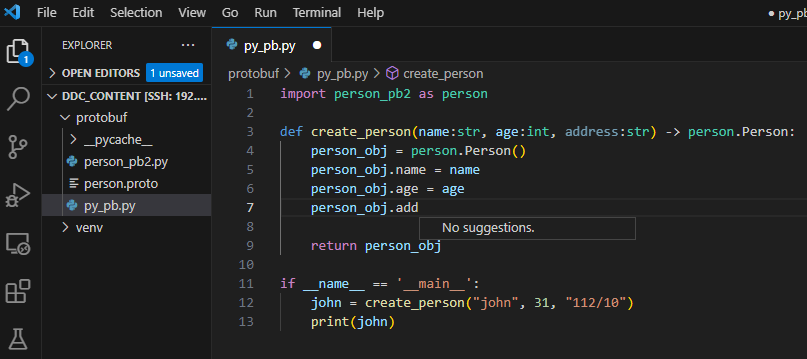
Code editor ไม่สามารถใช้งาน auto suggest ได้
วิธีแก้ปัญหานี้คือหากต้องการ compile .proto ไฟล์ เพื่อใช้งานกับภาษา python แนะนำให้เพิ่ม flag –pyi_out ในขั้นตอนการ compile ตัวอย่างเช่น
protoc person.proto --python_out=. --pyi_out=. โดย –pyi_out flag จะเป็นการสั่งให้ protoc สร้างไฟล์ stub สำหรับเก็บข้อมูลเบื้องต้นของ protobuf message class เพื่อให้ code editor มีข้อมูลของตัว message object และทำให้สามารถใช้งาน auto suggest หรือ auto complete ได้
from google.protobuf import descriptor as _descriptor
from google.protobuf import message as _message
from typing import ClassVar, Optional

DESCRIPTOR: _descriptor.FileDescriptor

class Person(_message. Message):
    __slots__ = ["address", "age", "name"]
    ADDRESS_FIELD_NUMBER: ClassVar[int]
    AGE_FIELD_NUMBER: ClassVar[int]
    NAME_FIELD_NUMBER: ClassVar[int]
    address: str
    age: int
    name: str
    def __init__(self, name: Optional[str] = ..., age: Optional[int] = ..., address: Optional[str] = ...) -> None: …
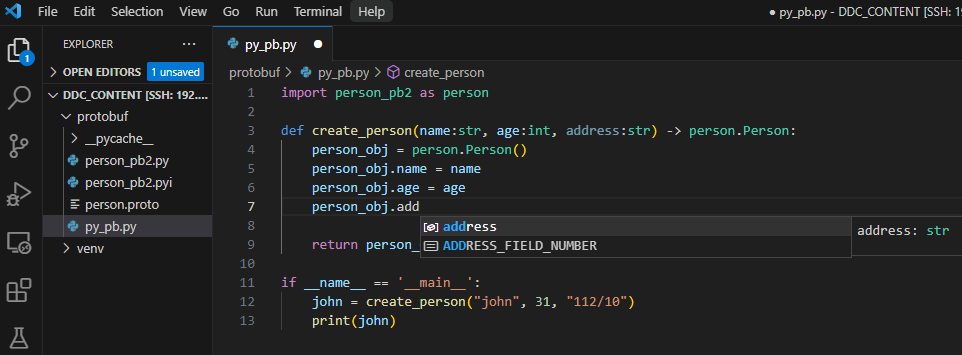
Code editor สามารถใช้งาน auto suggest ได้เมื่อมีไฟล์ .pyi
3. นำไฟล์ protobuf ที่ compile แล้วไปใช้งาน
#include "person.pb.h"

Person person;
person.set_name("่john");
person.set_age(31);
person.set_address("112/47");

string serializedPerson = person.SerializeAsString();
string serializedPerson = ...; // the serialized string from earlier

Person person;
person.ParseFromString(serializedPerson);

std::cout << "Name: " << person.name() << std::endl;
std::cout << "Age: " << person.age() << std::endl;
std::cout << "Address: " << person.address() << std::endl;
โครงสร้างพื้นฐานของไฟล์ .proto
syntax = "proto3";

package SensorMsg;

enum SensorModel {
    MODEL_X = 0;
    MODEL_Y = 1;
    MODEL_Z = 2;
}

message XData {
    float temp = 1;
}

message YData {
    float temp  = 1;
    float humid = 2;
}

message ZData {
    float temp  = 1;
    float humid = 2;
    int32 co2   = 3;
}

message Error {
    uint32 error_code = 1;
    string error_desc = 2;
}

message  SensorData {
    int32 msg_cnt = 1;
    SensorModel model = 2;
    repeated Error error_list = 3;
    oneof msg_data {
        XData x_data = 10;
        YData y_data = 11;
        ZData z_data = 12;
    }
}
syntax: เป็นส่วนที่บอกว่าไฟล์ .proto ใช้ syntax version อะไร โดยในปัจจุบัน proto3 คือเวอร์ชั่นใหม่ที่สุด
package: ชื่อ package ของไฟล์นี้
enum: ไว้ใช้สำหรับประกาศค่า enum เพื่อเอาไว้ mapping ค่าต่าง ๆ
message: เป็นการประกาศชื่อ message type ต่างๆ โดยแค่ละ field จะมีส่วนประกอบย่อย ๆ อีกดังนี้
- Field rule ตัวอย่างเช่น repeated ที่บอกว่าอาจจะมีลักษณะเหมือน array ที่มีค่าได้มากได้มากกว่า 1 ค่า หรือ oneof ใช้ในกรณีที่ต้องการบอกว่าใน field นั้นจะมีค่าแค่ type เดียวจากที่แสดงเท่านั้น
- Type เพื่อบอกว่าข้อมูลเป็นชนิดอะไร โดยชนิดข้อมูลที่รองรับสามารถดูได้จาก ลิงค์นี้ นอกจากนั้นยังสามารถเอา enum หรือ message type อื่นๆ มาใช้เป็นชนิดข้อมูลของ field ได้เช่นกัน
- Field name ชื่อของ field
- Tag number เป็นเหมือนกับ id ของ field ที่จะระบุอยู่ในข้อมูลที่ serialization ออกไป โดยหากต้องการให้ข้อมูลที่ serialization ออกไป forward-compatible หรือ backward-compatible จะต้องห้ามแก้ไขหมายเลขนี้เด็ดขาด เช่นหากต้องการลด field ก็สามารถลบ field ออกไปได้เลย แต่ห้ามแก้ให้ field อื่นๆมาใช้ tag number ชอง field ที่ลบไป หรือหากต้องการเพิ่ม field ก็ต้องใช้เลข tag number ใหม่ที่ยังไม่มีการใช้งานมาก่อน เป็นต้น